Exploring Android RoleManager

RoleManager is Android class that manages roles in your device.
What is role?
Android documentation defines a “role” as a unique name within the system associated with certain privileges.
To help you understand it better, these are the roles that are currently available in Android system:
ROLE_ASSISTANT: An app that holds this role will be used as the default assistant app.ROLE_BROWSER: An app that holds this role will be used as the default Internet browser app.ROLE_CALL_REDIRECTION: An app that holds this role will be able to manage redirecting outgoing calls.ROLE_CALL_SCREENING: An app that holds this role will be able to screen calls and provide call identification.ROLE_DIALER: An app that holds this role will be used as the default dialer app.ROLE_EMERGENCY: An app that holds this role will be used as the default emergency service app (for system apps only).ROLE_HOME: An app that holds this role will be used as the default home app.ROLE_SMS: An app that holds this role will be used as the default SMS app.ROLE_SYSTEM_GALLERY: An app that holds this role will be used as the default gallery app (for system apps only).
Basically by holding one of these roles, your app will be the default app for certain use cases. For example, by holding ROLE_BROWSER role, your app will be used by default as Internet browser app.
Each role has different requirements that must be met before they can be requested correctly. Read each role’s documentation above for more information.
To make things convenient, RoleManager class has these 3 methods for managing roles:
isRoleAvailable(role: String): Checks whether the givenroleis available on the system.isRoleHeld(role: String): Checks whether current app is holding the givenrole.createRequestRoleIntent(role: String): Returns an Intent that prompts user to grant the givenroleto current app.
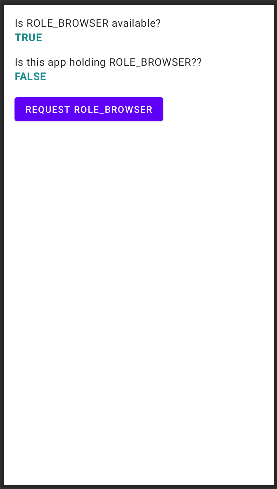
In this article, we will create a simple application to demonstrate this RoleManager class. We will create an application that requests the ROLE_BROWSER as shown in the image below:

ROLE_BROWSER to user. Once the role is granted, this app will be the default Internet browser app.Where’s the Source Code?
Step by Step Explanation
Follow the steps provided below to create this application.
1. Open Android Studio. Create new project with “Empty Activity” option.
2. First, we need to add an Intent Filter so that our app can handle the intent to browse the Internet. This is the requirement for requesting ROLE_BROWSER role. Other roles will have different requirements. Open AndroidManifest.xml file and update it like this:
3. Next, we will update our layout file, activity_main.xml. As you can see in the image below, the layout will contain 2 TextViews for displaying whether the role is available in the device and whether this app is holding the role. It also contains a Button that will request user to grant the role to this app
activity_main.xml file should look like.To create this layout, copy-paste the code snippet below:
4. Lastly, we need to update our MainActivity.kt file. Go ahead and copy-paste the code snippet below. The most important things to notice are the usages of createRequestRoleIntent(), isRoleAvailable(), and isRoleHeld() methods. It’s very straightforward!
5. That’s it! Now run your app and you should see something like this:
ROLE_BROWSER to user. Once the role is granted, this app will be the default Internet browser app.As always, thanks for reading!